Today's guide on how to
install Android 5.0 Lollipop on Nexus 4 Smartphone is going to be brief.
Of course you should know the
great benefits of installing android 5.0 Lollipop on your nexus 4 device. Check
out more about android 5.0 Lollipop, and things you need to know about it.
Previously, I published a guide on how to install android 5.0 lollipop on Nexus 5 and Nexus 7 smartphones and I know that by now, Nexus 5 and Nexus 7
users would be enjoying the upgrade on their smartphones.
Below explains a brief guide
on how to install android 5.0 lollipop on Nexus 4 smartphones.
Best Way to install
Android 5.0 Lollipop on Nexus 4 Smartphones
Step 1: First off- Download the USB driver of Nexus 4 via here
and install the USB driver for Nexus 4 on your Windows PC
Step 2: After you have successfully performed the above step,
then remember to unlock the boot-loader of your Nexus 4 smartphone. If
you have unlocked it before, then skip this step and move to the next.
Step 3: Download the ADB and Fastboot files and then extract the folder to your desktop
screen.
Step 4: Once you have downloaded the fastboot and adb files,
then download the factory image of Nexus 4 android 5.0 lollipop via here
and extract the folder to your desktop screen. You would notice few files in
the folder, as mentioned below:
A radio and bootloader image
flash-all.bat
flash-all.sh
flash-base.sh
image-****-lrx21t.zip
Step 5: Then copy all the files mentioned above and paste
them in the ADB folder you extracted to your desktop screen which was initiated
in step 3.
Step 6: Once you have successfully copied the files, then
enable USB debugging mode on your Nexus 4 device. To enable USB debugging mode
on your Nexus 4 device, simply move to Settings >> About Phone >>
Build Number (Tap it 7times), by doing so, it would unhidden the developers
option. Then enable USB debugging in the developers option.
Step 7: Once you have enabled USB debugging on your Nexus 4
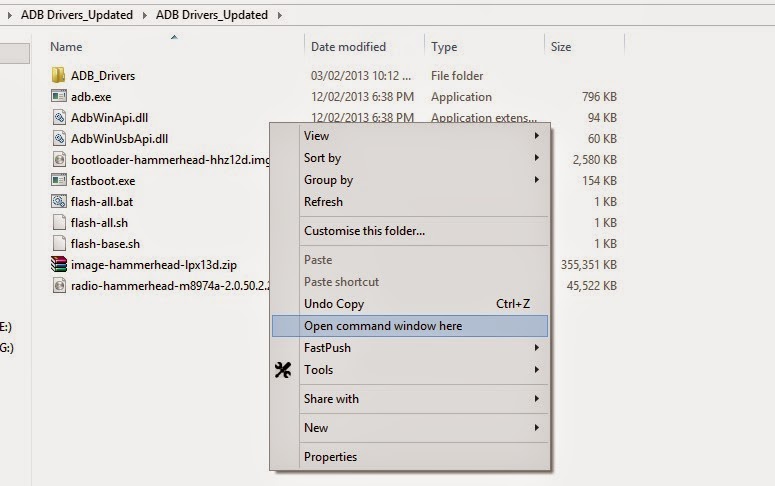
device, the connect your device to the PC. And on your PC, open the comand
prompt windows on the ADB folder. To do so, simply hold the shift button on the
keyboard of your PC and Right click on the white space of the folder, then
click on “Open Command Window
here”. Of course, the
below image gives a clear picture of what I mean.
Step 8: Once you have open the command prompt, then enter the
below command on your windows.
fastboot devices
NB: The above command helps to bring out the list of
connected device, if your device is listed, then you are good to go, but if
not, then check your drivers if it's installed properly.
Step 9: Then once your windows is in fastboot mode, simply
run the below command.
adb reboot bootloader
Step 10: Once you have input the above command prompt, simply
move to the ADB folder you extracted to your desktop screen, and locate and
click on the "flash-all" file, and the installation process would
begin.
Step 11: Once the installation begins, you would see alternating
downloading, writing, erasing just as shown in the image below.
Step 12: When the installation process is completed, then your
Nexus 4 device would reboot. At this time, you can now disconnect your device
from your computer. Once the reboot is completed, your Nexus 4 device would
start running Android 5.0 Lollipop.
Hope this brief tutorial
helps. If you encounter any form of difficulty during the process of
installation, please do let us know, and we won't hesitate to tackle the problem
at once.
If you find the tutorial
useful, then Like & Share it with your social friends. The social buttons
below can be very useful. I would also appreciate your tweets about this
tutorial.
CareerGiGo is an online publication created for Immigrants in search of better life abroad. It's also an >> Information hub for Immigrants, study abroad, visa guide and job offers. They focus more on helping Asians and Africans who wish to travel abroad, study and also work there.
Best Way to install Android 5.0 Lollipop on Nexus 4 Smartphone
4/
5
Oleh
Anyikwa chinonso


1 blogger:
Great tips on android 5.0 lollipop. also more lollipop reviews can be found here
Reply